4. Calibrate & configure your cameras
In order for MAPLE to calculate the location of your robot in 3D space, it must know exactly where your cameras are located on the robot. Additionally, typical camera lenses introduce distortion into your images, and will cause your pose estimates to be incorrect if this is not accounted for.
This section goes over the config.yml file which you will edit to exactly describe where each camera is located on the
robot, how much distortion there is for each camera, what resolution/framerate to run each camera at, and so on. You will
have the following config.yml template in the ~/maple-config folder on your coprocessor:
# Configuration file for MAPLE

team_number: -1
pose_logging: true

cameras:
# front left
  CAM_LEFT:
    # maps to /dev/video4
    camera_id: 4
    rx: 640
    ry: 480

    # focal length (in pixels)
    fx: 428
    fy: 428

    # center of the camera image (in pixels)
    cx: 320
    cy: 240

    # Camera x, y, z location on the robot, in meters
    translation: [-0.10, 0, 0]

    # Camera roll, pitch, yaw orientation on the robot, in degrees
    rotation: [0, 0, 0]

    fps: 30.0
    exposure: 1

# front right
  CAM_RIGHT:
    # maps to /dev/video6
    camera_id: 6
    rx: 544
    ry: 288

    # focal length (in pixels)
    fx: 590.588
    fy: 543.682

    # center of the camera image (in pixels)
    cx: 279.683
    cy: 136.174
    dist_coeffs: [ 0.0814261, -0.0272061, -0.00493096, 0.00292767, 0.799907 ]

    # Camera x, y, z location on the robot, in meters
    translation: [0.10, 0, 0]

    # Camera roll, pitch, yaw orientation on the robot, in degrees
    rotation: [0, 0, 0]

    fps: 30.0
    exposure: 1
4.1. Select camera devices
MAPLE must know which camera devices that you have plugged into your coprocessor should be used for Apriltag detection.
First, connect all of your cameras to your coprocessor, then reboot the device.
Warning
MAPLE uses video device IDs (or names, such as /dev/videoXX) to map cameras for its pose calculations. Video device IDs typically stay
consistent through reboots, but isn’t guaranteed.
Next, run the following command in a terminal connected to the coprocessor:
sudo v4l2-ctl --list-devices
This will display all video capture devices connected to your coprocessor and their associated video device IDs. The first ID listed for each camera is typically the one that will open the main video capture. For example, we can see there are 4 cameras connected to our coprocessor in the following output:
C505e HD Webcam (usb-0000:01:00.0-1.1):
     /dev/video0
     /dev/video1
     /dev/media4

Arducam OV9281 USB Camera: Ardu (usb-0000:01:00.0-1.2):
     /dev/video2
     /dev/video3
     /dev/media5

C505e HD Webcam (usb-0000:01:00.0-1.3):
     /dev/video4
     /dev/video5
     /dev/media6

C505e HD Webcam (usb-0000:01:00.0-1.4):
     /dev/video6
     /dev/video7
     /dev/media7
For each camera, we can see what the supported framerates and resolutions are with the following command. Use the first video ID for the camera you’d like to inspect.
sudo v4l2-ctl --device /dev/video0 --list-formats-ext
We’re interested in the MPJEG section:
[1]: 'MJPG' (Motion-JPEG, compressed)
    Size: Discrete 640x480
        Interval: Discrete 0.033s (30.000 fps)
        Interval: Discrete 0.040s (25.000 fps)
        Interval: Discrete 0.050s (20.000 fps)
        Interval: Discrete 0.067s (15.000 fps)
        Interval: Discrete 0.100s (10.000 fps)
        Interval: Discrete 0.200s (5.000 fps)
    Size: Discrete 160x120
        Interval: Discrete 0.033s (30.000 fps)
        Interval: Discrete 0.040s (25.000 fps)
        Interval: Discrete 0.050s (20.000 fps)
        Interval: Discrete 0.067s (15.000 fps)
        Interval: Discrete 0.100s (10.000 fps)
        Interval: Discrete 0.200s (5.000 fps)
    Size: Discrete 176x144
        Interval: Discrete 0.033s (30.000 fps)
        Interval: Discrete 0.040s (25.000 fps)
        Interval: Discrete 0.050s (20.000 fps)
        Interval: Discrete 0.067s (15.000 fps)
        Interval: Discrete 0.100s (10.000 fps)
        Interval: Discrete 0.200s (5.000 fps)
    ....
Since multiple cameras attached to our coprocessor are the same model,
we will need to do some trial and error to figure out which camera is which. Start by adding a camera entry in your config.yml
file and assign it a camera_id (use the first video ID in the list). Set your desired resolution, framerate, and
you may use placeholder fx, fy, cx, and cy values.
# Configuration file for MAPLE

team_number: -1
pose_logging: true

cameras:
# front left
  CAM_LEFT:
    # maps to /dev/video0
    camera_id: 0

    rx: 544
    ry: 288

    # placeholder values until calibration is run
    fx: 600
    fy: 600
    cx: 272
    cy: 144
Restart MAPLE, then navigate to the webUI at http://maple.local:8080.
On the left side, you should see a live video feed. Verify the camera image is coming from the desired camera. If the video
feed is coming from the wrong camera, modify your config.yml to change either the camera name or camera_id so it
maps to the correct camera.
Note
If the camera image is black but displays a framerate in the top right corner, your exposure may be too low. Increase the
value of your exposure parameter in config.yml.
Repeat this process for each camera.
Tip
Right click to pan, left click to rotate, and scroll to zoom in the 3D visualizer.
Scroll through the video feeds on the left to see each camera’s live stream.
Note
Once all cameras have been sucessfully added, completely power off your coprocessor, turn it back on, and verify each camera feed is coming from the correct source.
4.2. Calibrate cameras
Camera calibration is not required but is easy to setup and recommended for accurate pose estimation. See Camera lens distortion and calibration for instructions and details.
4.3. Set camera positions and orientations
Each camera in the config.yml file must have a translation and rotation set which specifies where the camera is mounted
relative to the center of the robot. Translation and rotation are measured in meters and degrees respectively. Let’s step through
figuring out the translation and rotation of a camera in a few examples.
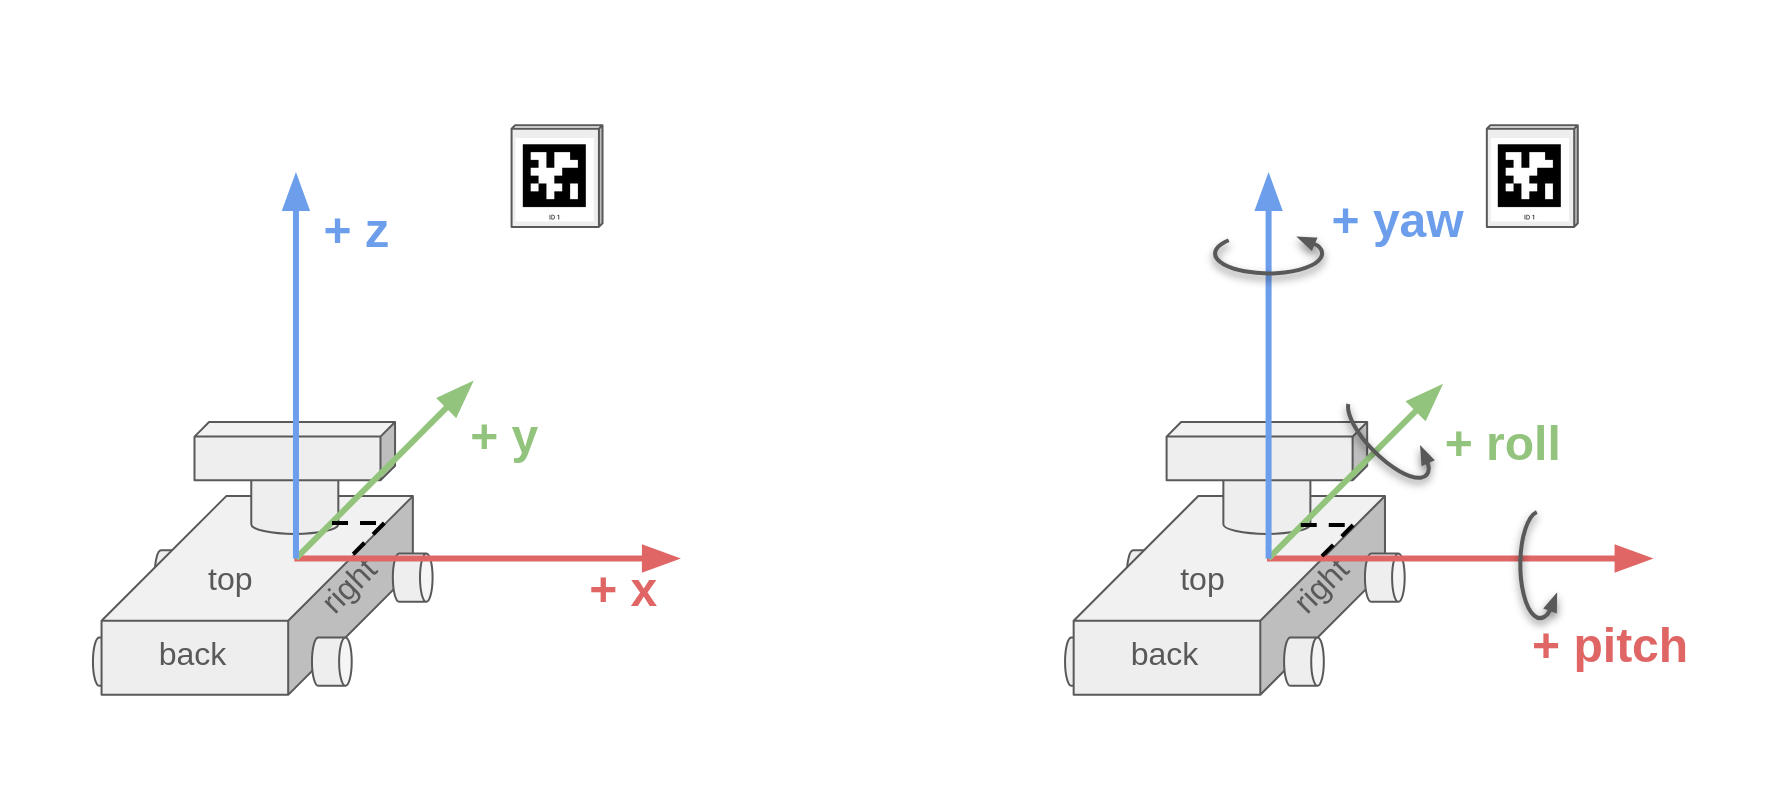
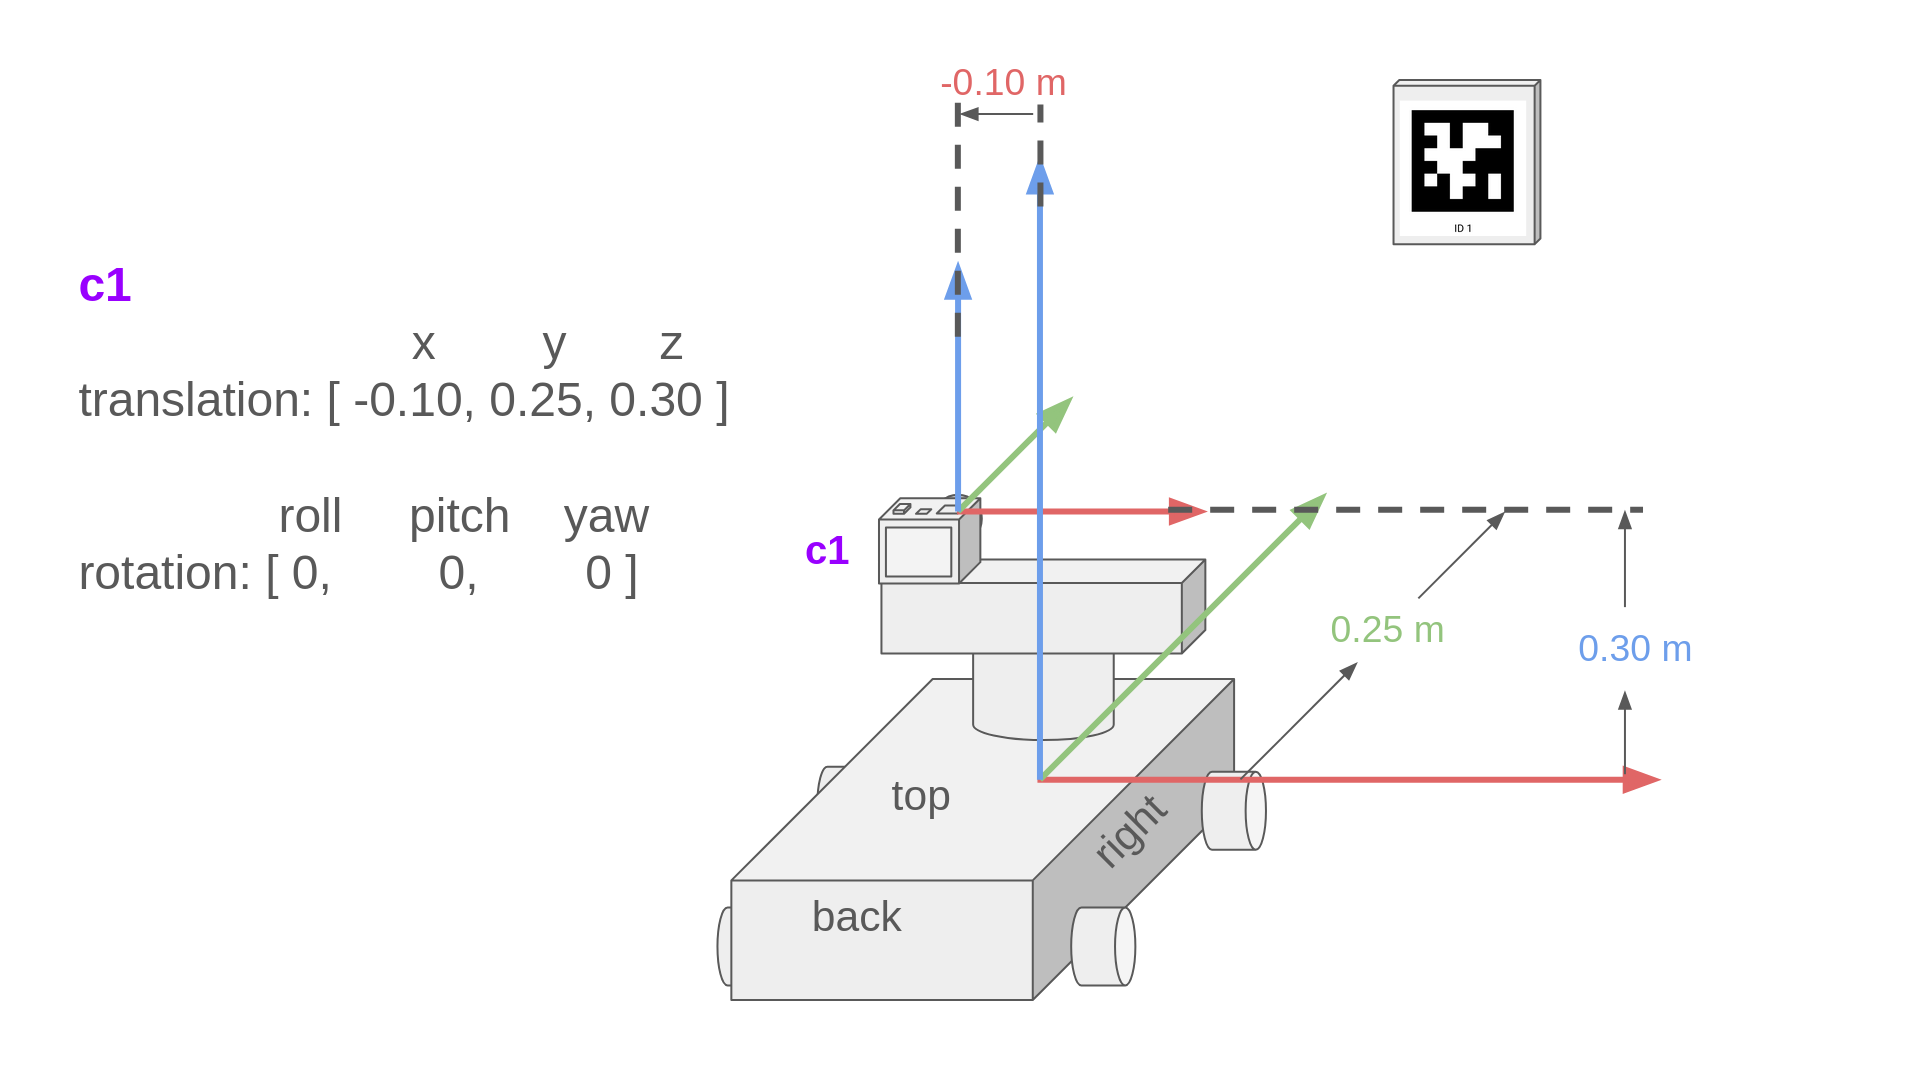
The image below describes the robot frame, which is at the center of the robot. A “frame” is a point of view and we setup an axis system (x, y, z here) at the center of the frame. We use the “right hand rule” or “north east down” (NED) naming convention to define the positive directions of the x, y, and z axis. We will make all measurements relative to the robot frame of reference.
Each of your cameras also have their own camera frame, which you can see below. The center of the camera frame is at the center of the camera lens.
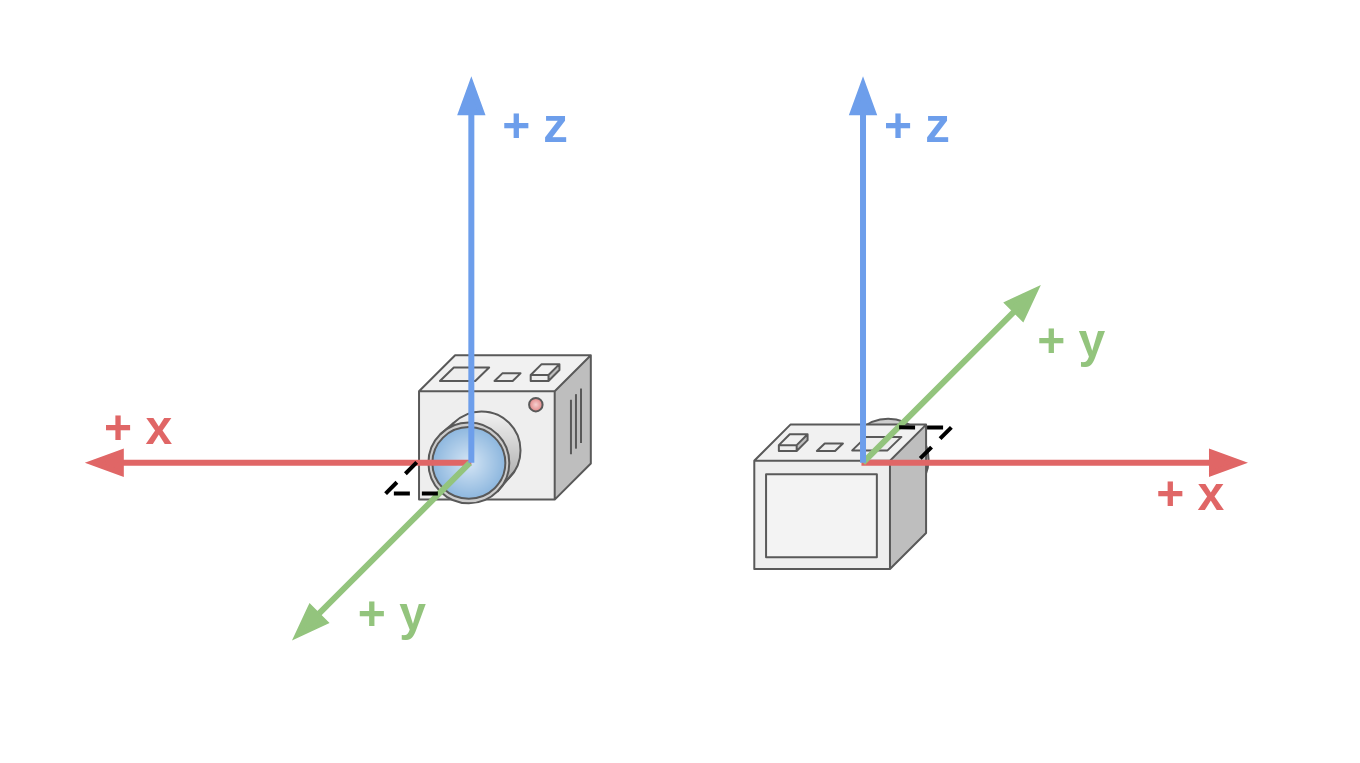
In this first example, the camera frame c1 is not rotated at all, but is translated forwards, up, and to the left of the center of the robot. We measure how the camera frame c1 moved relative to the robot frame. In this case, it moved positive 0.25 meters forwards along the Y axis, positive 0.3 meters up along the Z axis, and negative 0.10 meters left on the X axis. Since the positive direction of the robot’s X axis is to the right, and the camera is to the left, the measurement must be negative.
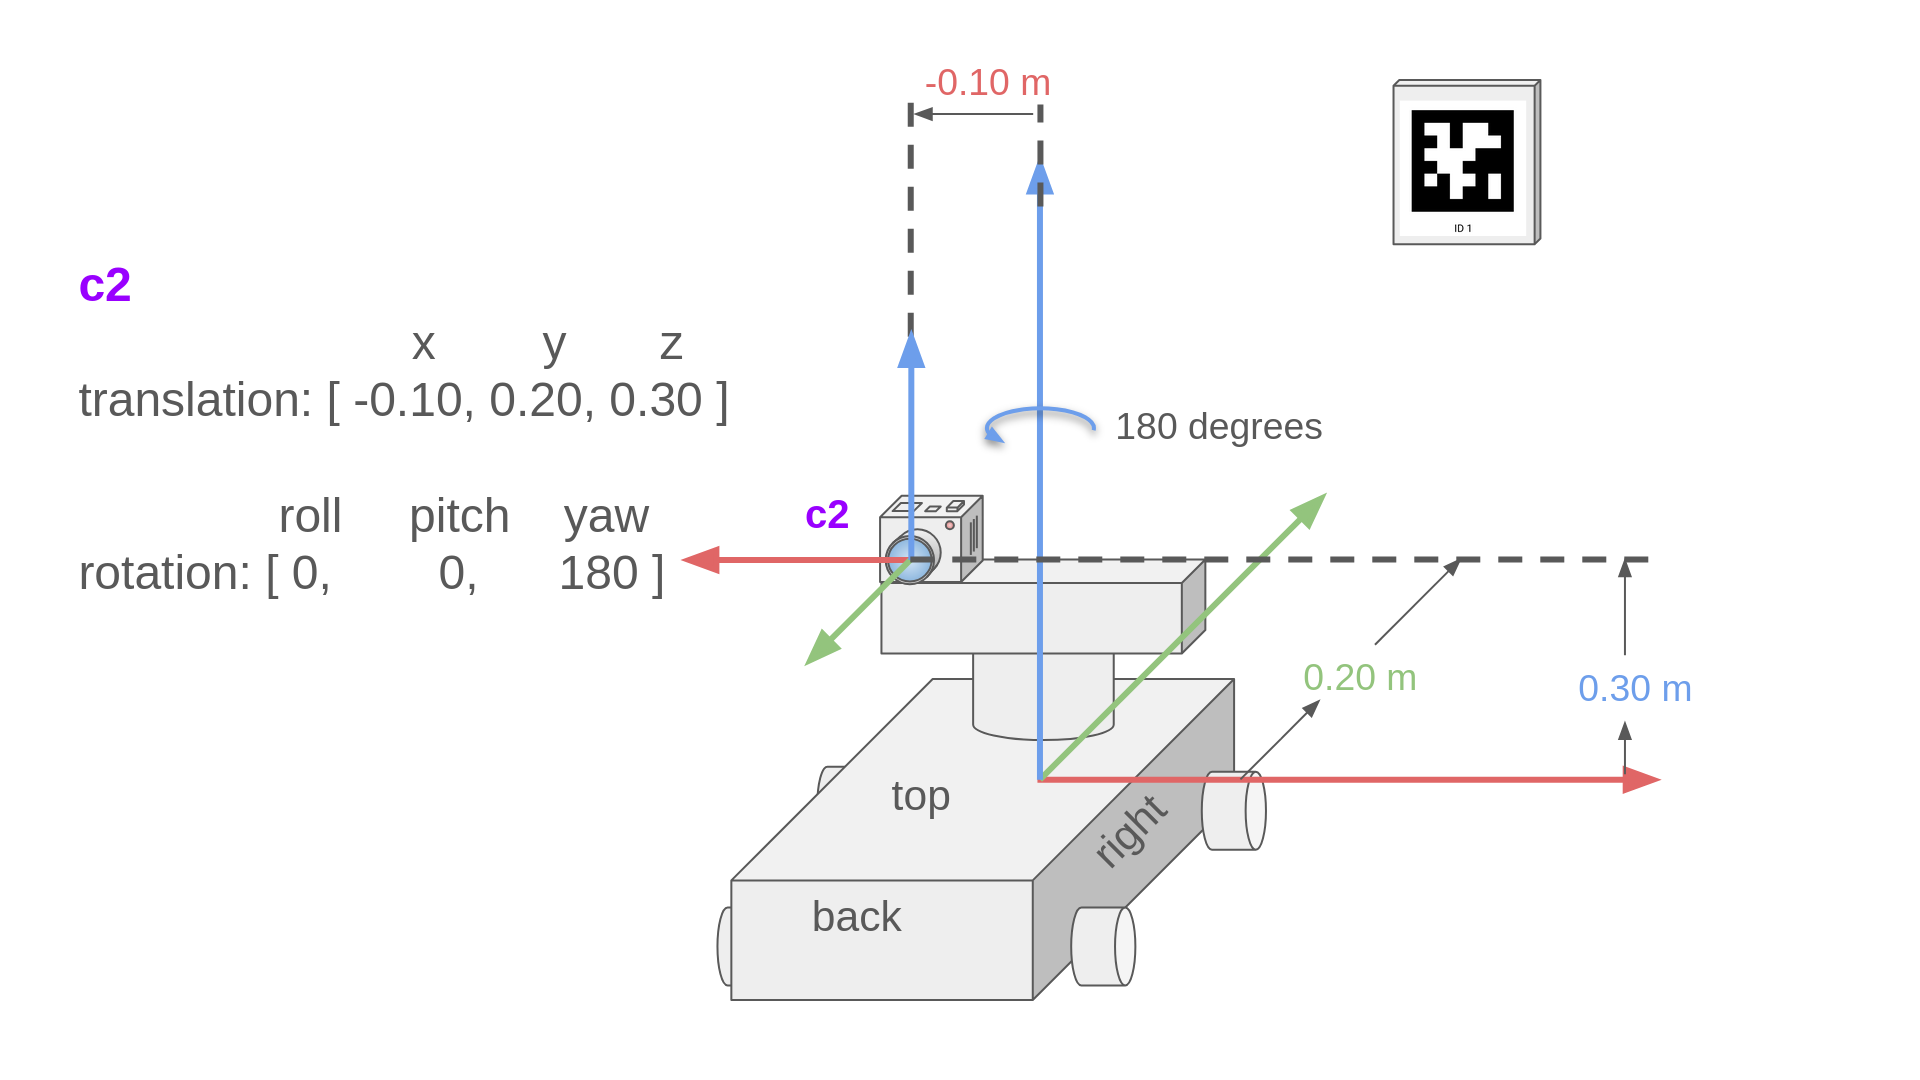
In the second example, the camera frame c2 is in the same location (almost) as the first example, but it has rotated 180 degrees so it is looking backwards. Notice that the Y translation value has changed by 0.05 meters. Since the camera rotated in place and we measure from the camera lens, the camera frame has actually moved backwards 0.05 meters relative to the robot frame.
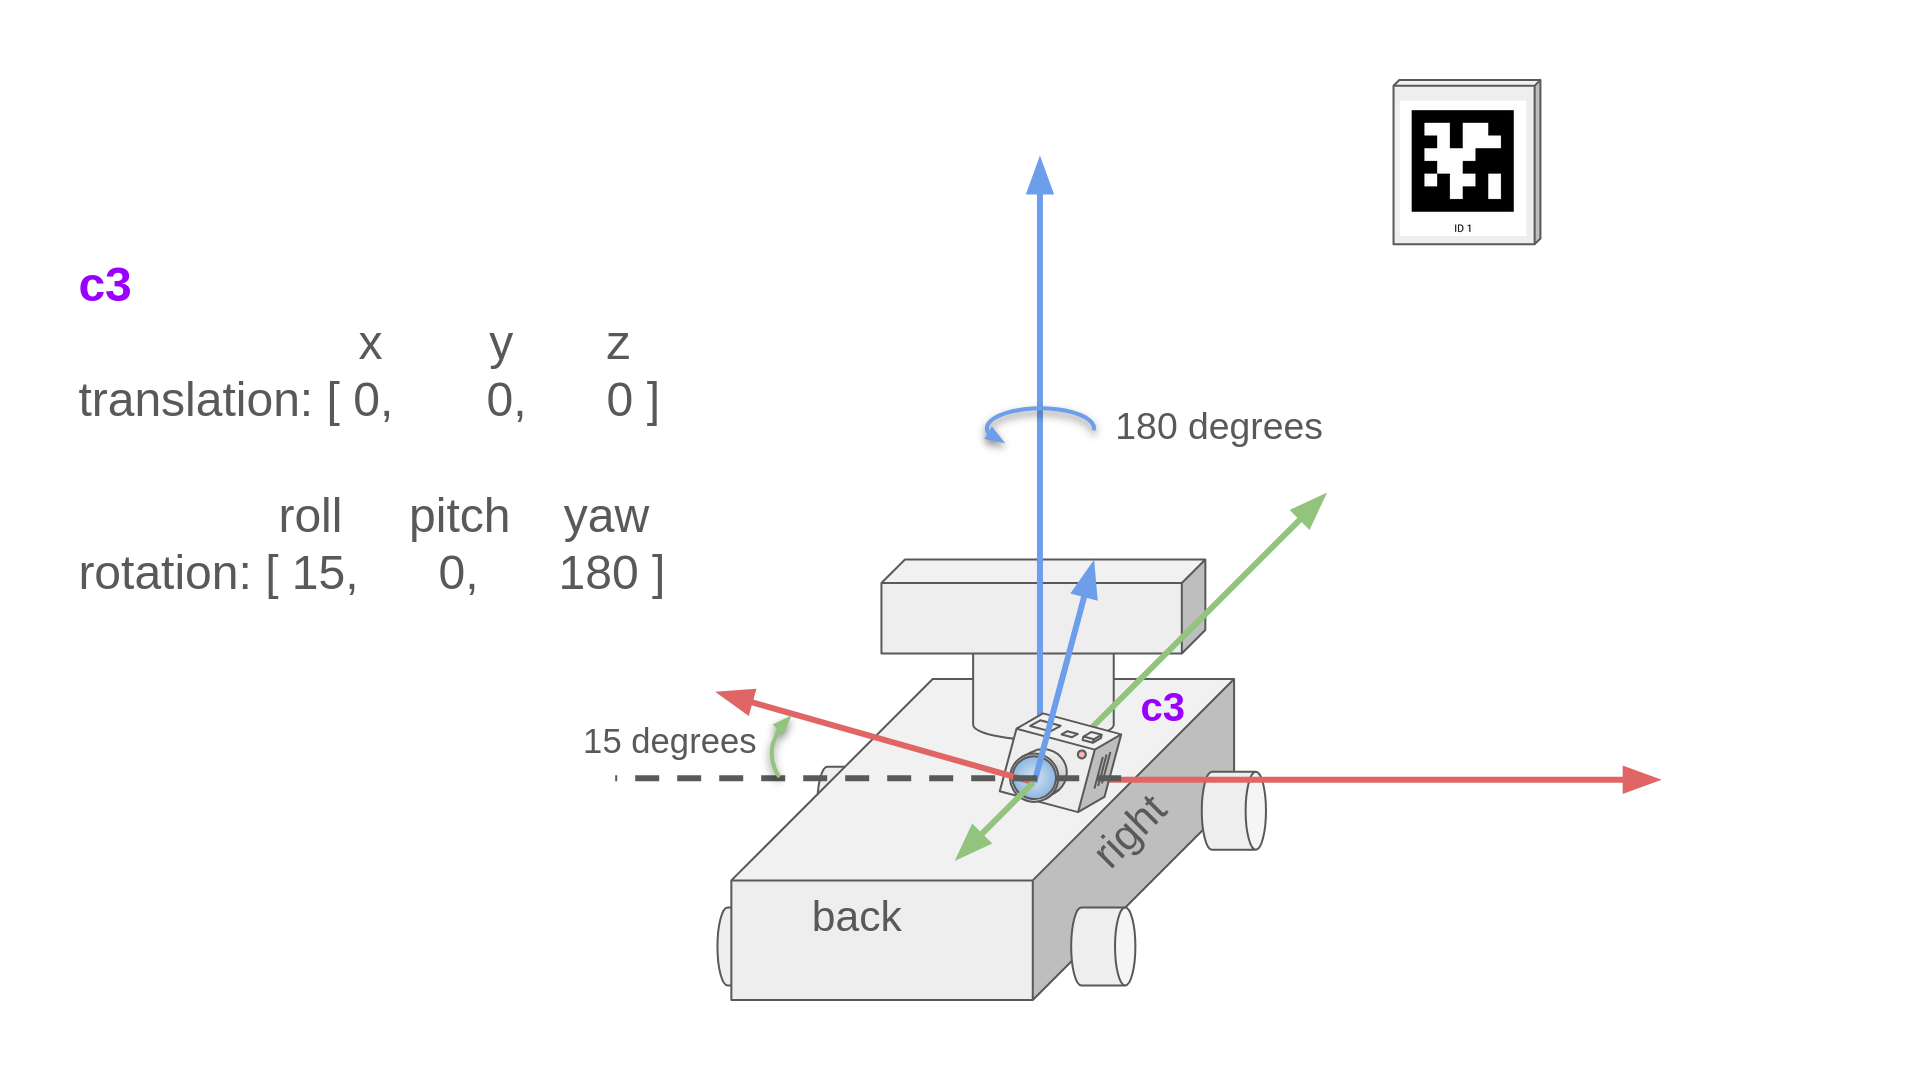
In the third example, the camera is located at the center of the robot, looking backwards, and is tilted 15 degrees. The same 180 degree rotation still applies, but now we must measure the tilt of the camera relative to the robot frame.
We can see that the camera is not pitched forwards or backwards relative to the robot frame, but is tilted 15 positive degrees in the roll direction relative to the robot.
Note
All rotation and translation measurements are relative to the robot frame (robot center). For example, if you point a camera up 45 degrees (+45 degree pitch relative to the camera frame), but the camera is pointed left on the robot, this is actually a +45 degree roll and +90 degree yaw.
4.4. All config.yml parameters
4.4.1. MAPLE Parameters
Parameter name & type |
Description |
Required (Y/N) |
Default value |
|---|---|---|---|
team_number - |
The FRC team number. Used to connect MAPLE to NetworkTables. If no number is supplied, MAPLE will not attempt to connect to NetworkTables. |
N |
|
fmap_file - |
The path to the |
N |
|
video_recording - |
Write camera frames to .mp4 video files. This will disable Apriltag detection. |
N |
|
4.4.2. Camera Parameters
Warning
Some cameras have firmware that do not let you manually set FPS and/or exposure. In these cases, the FPS/exposure will depend on the lighting conditions when MAPLE first starts. See Choosing your coprocessor and cameras for details.
Parameter name & type |
Description |
Required (Y/N) |
Default value |
|---|---|---|---|
camera_id - |
The camera device ID identified by the OS. You can find this value in |
Y |
N/A |
camera_playback_file - |
Open a .mp4 video file instead of a camera device to run Apriltag detection on. Specifies the path to the .mp4 file. |
N |
|
rx - |
The desired camera resolution X. Will use the closest available resolution. |
Y |
N/A |
ry - |
The desired camera resolution Y. Will use the closest available resolution. |
Y |
N/A |
calibrate - |
Enable calibration mode on this camera. Use a 9x6 chessboard calibration target to calculate the camera intrinsic matrix (fx, fy, cx, cy) and the distortion coefficients. If values for fx, fy, cx, and cy are provided in the configuration file, use these as the initial guess for the camera intrinsic matrix during the calculation. Camera closes after calibration is complete. |
N |
|
fx - |
The focal length (in pixels) for x. fx = pixels/mm * focalLength_mm. Can be calculated by the calibration routine. |
Y |
N/A |
fx - |
The focal length (in pixels) for y. fy = pixels/mm * focalLength_mm. Can be calculated by the calibration routine. |
Y |
N/A |
cx - |
The center of the image in the x axis in pixels. Can be calculated by the calibration routine. |
Y |
N/A |
cy - |
The center of the image in the y axis in pixels. Can be calculated by the calibration routine. |
Y |
N/A |
dist_coeffs - |
The distortion coefficients to undistort the image. Run the calibration routine to calculate these values. |
N |
|
fps - |
The desired FPS to set the camera to. If the camera doesn’t support the specified FPS, the closet supported framerate will be used. If the FPS is too high and data cannot be processed fast enough, the camera may run at a lower FPS. |
Y |
N/A |
exposure - |
The desired camera exposure. Range varies per camera. Lower values mean less exposure time and darker images. |
Y |
N/A |